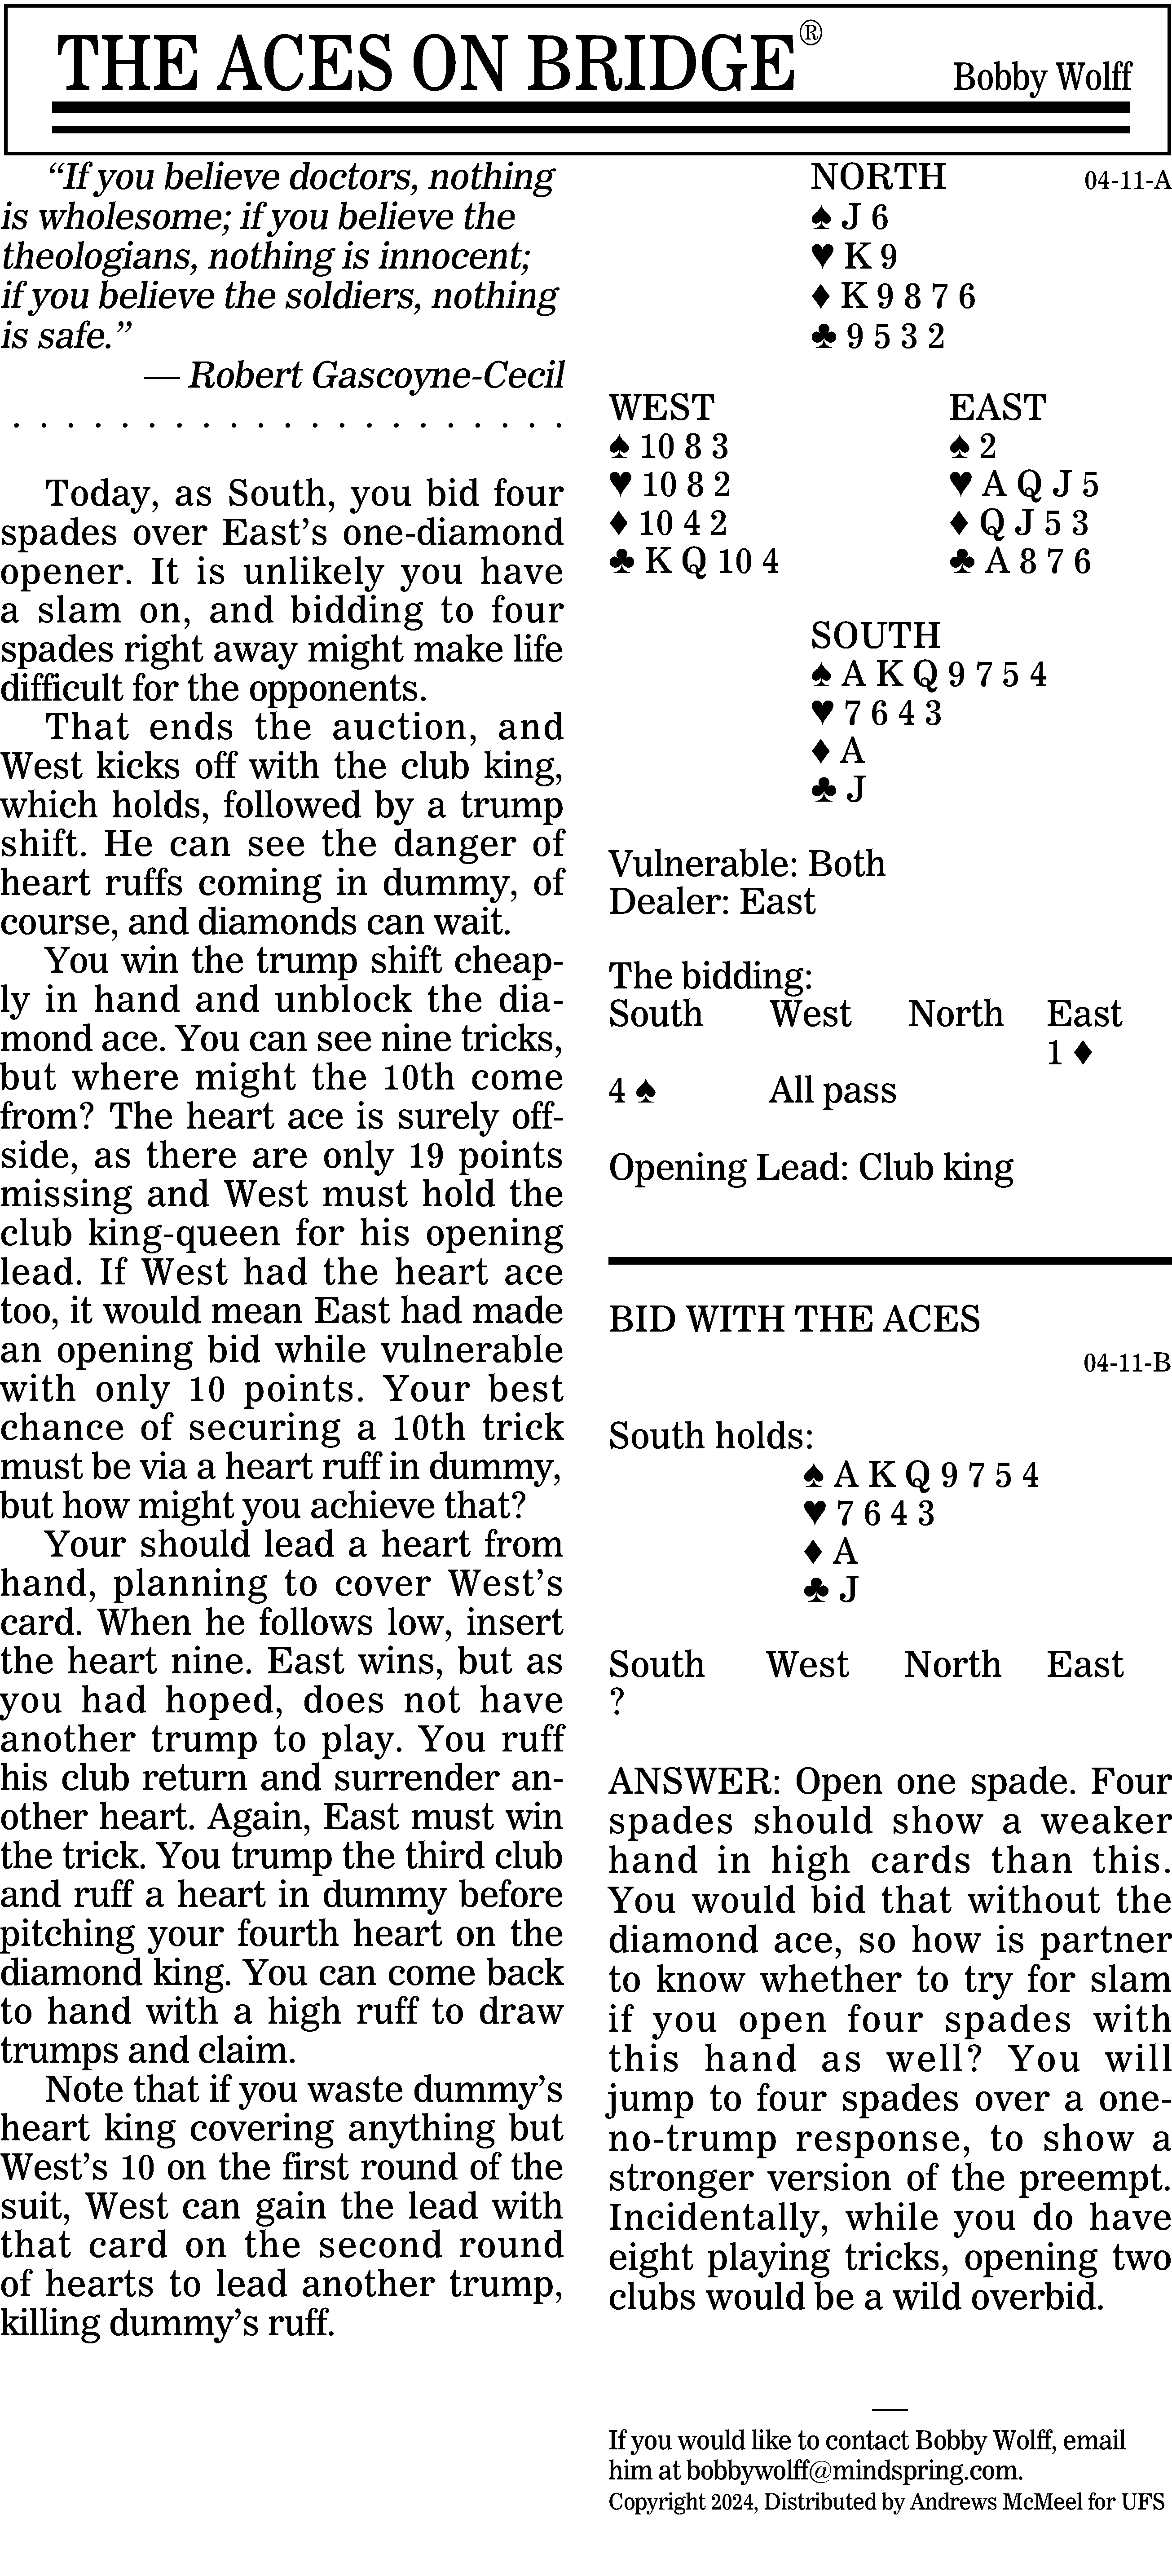
Also, with today’s quote in mind, if you believe grubby bridge writers and teachers, and you sitting West, while holding either the J10 or Q10 of hearts, do not forget to rise with the 10 on the first heart lead from declarer, otherwise take a good look at your beautiful partner now (whether pretty, handsome or not) since this bridge session may be your last to see her or him, in that position. Just saying and if done, your partner needs to duck the next heart from dummy when led from there or he may not be seeing you.
Successful quotes need to be completed before the gloating begins, but if West does not possess that key second heart honor and East plays good bridge, you’ll be conceding an overtrick that no one else will ever score up, even if everyone lives to 100.
David SnookMay 9th, 2024 at 4:35 pm
Hi Bobby…
Hmmmm…
Is the key here leading hearts towards dummy after taking the trump trick and playing my diamond ace?
It seems like the only way declarer can make four spades is if East has only one trump and holds all the high hearts.
When I play a heart at trick three, if West doesn’t cover with the ten, I insert the nine from dummy leaving my king unprotected, which is fine when East takes the king with the ace on the next trick. If West plays the heart ten, I would cover with the king and now dummy’s heart nine becomes the highest heart not with East.
Either way, East ends up on lead and doesn’t have a trump to play. Declarer can take anything led, then in turn trump a heart with dummy’s remaining spade and when back in dummy, play the diamond king to discard the final heart from my hand.
Does that sequence work?
bobbywolffMay 9th, 2024 at 7:51 pm
Hi David,
To use your words, the key is to lose both heart tricks to East, not West, so that a trump
will be left in dummy, to dispose of a diamond loser, otherwise go set.
When West elects to lead the king of clubs, he gives away the likely location, because of the telltale bidding, of where the ace of hearts is located, therefore, by taking advantage of keeping East, not West, on lead, declarer has gained a full trick. It turns out to be the fulfilling contract trick, representing a large swing, and well worth gaining.
Of course if West had been dealt two intermediate hearts, he could have forced entry to his hand to accomplish the set. The above represents excellent bridge as opposed to not so, when West might have been dealt two intermediate hearts from the QJ10, but was not, thus allowing declarer to use his “noodle” and take careful advantage of that fact.
Always key your thoughts directed to making and setting contracts and although at “matchpoint bridge” overtricks become important, do not emphasize their importance in either rubber or IMP bridge, where the amount of gain or loss is grossly the overriding
goal, rather than tiny overtricks. And always, GOOD LUCK IN YOUR DESIRE TO GET BETTER WITH EVERY SESSION OF BRIDGE YOU CAN PLAY.


Hi Everyone,
Also, with today’s quote in mind, if you believe grubby bridge writers and teachers, and you sitting West, while holding either the J10 or Q10 of hearts, do not forget to rise with the 10 on the first heart lead from declarer, otherwise take a good look at your beautiful partner now (whether pretty, handsome or not) since this bridge session may be your last to see her or him, in that position. Just saying and if done, your partner needs to duck the next heart from dummy when led from there or he may not be seeing you.
Successful quotes need to be completed before the gloating begins, but if West does not possess that key second heart honor and East plays good bridge, you’ll be conceding an overtrick that no one else will ever score up, even if everyone lives to 100.
Hi Bobby…
Hmmmm…
Is the key here leading hearts towards dummy after taking the trump trick and playing my diamond ace?
It seems like the only way declarer can make four spades is if East has only one trump and holds all the high hearts.
When I play a heart at trick three, if West doesn’t cover with the ten, I insert the nine from dummy leaving my king unprotected, which is fine when East takes the king with the ace on the next trick. If West plays the heart ten, I would cover with the king and now dummy’s heart nine becomes the highest heart not with East.
Either way, East ends up on lead and doesn’t have a trump to play. Declarer can take anything led, then in turn trump a heart with dummy’s remaining spade and when back in dummy, play the diamond king to discard the final heart from my hand.
Does that sequence work?
Hi David,
To use your words, the key is to lose both heart tricks to East, not West, so that a trump
will be left in dummy, to dispose of a diamond loser, otherwise go set.
When West elects to lead the king of clubs, he gives away the likely location, because of the telltale bidding, of where the ace of hearts is located, therefore, by taking advantage of keeping East, not West, on lead, declarer has gained a full trick. It turns out to be the fulfilling contract trick, representing a large swing, and well worth gaining.
Of course if West had been dealt two intermediate hearts, he could have forced entry to his hand to accomplish the set. The above represents excellent bridge as opposed to not so, when West might have been dealt two intermediate hearts from the QJ10, but was not, thus allowing declarer to use his “noodle” and take careful advantage of that fact.
Always key your thoughts directed to making and setting contracts and although at “matchpoint bridge” overtricks become important, do not emphasize their importance in either rubber or IMP bridge, where the amount of gain or loss is grossly the overriding
goal, rather than tiny overtricks. And always, GOOD LUCK IN YOUR DESIRE TO GET BETTER WITH EVERY SESSION OF BRIDGE YOU CAN PLAY.